How to make a before-and-after product video
Nothing proves a product works like a before and after: the stained shirt and the clean one, the dull floor and the shiny one, the bare face and the finished look. This guide shows two ways to make a before-and-after video in Mshopi, how to film so the comparison is fair, and how to keep it honest.
Who before-and-after videos are for
Cleaning products, stain removers, car care, skincare and makeup, hair products, phone screen protectors, home decor and organisers, tailoring and alterations, repairs and restorations. If your product changes something visibly, show the change.
Film a fair comparison
The comparison only convinces people if everything except the result stays the same:
- Same position: put the phone on a stand and don't move it between the shots. Mark the spot with tape if you need to move away.
- Same light: film both shots at the same time of day, with the same lamps on or off.
- Same framing and zoom.
- No extra filters on the after shot. If you colour-correct, apply the same filter to both clips.
Keep it honest. Use real results from your product, filmed as they happened. Edited or exaggerated results mislead customers, break advertising rules and lead to returns and bad reviews.
Method 1: the wipe reveal
The after image sweeps across the before image, like a curtain. It's dramatic and works well vertically.
- Choose Edit my own video, import both clips (or photos) and click them in order: before, then after. They sit next to each other on Video 1.
- Select the after clip (the transition plays as it comes in).
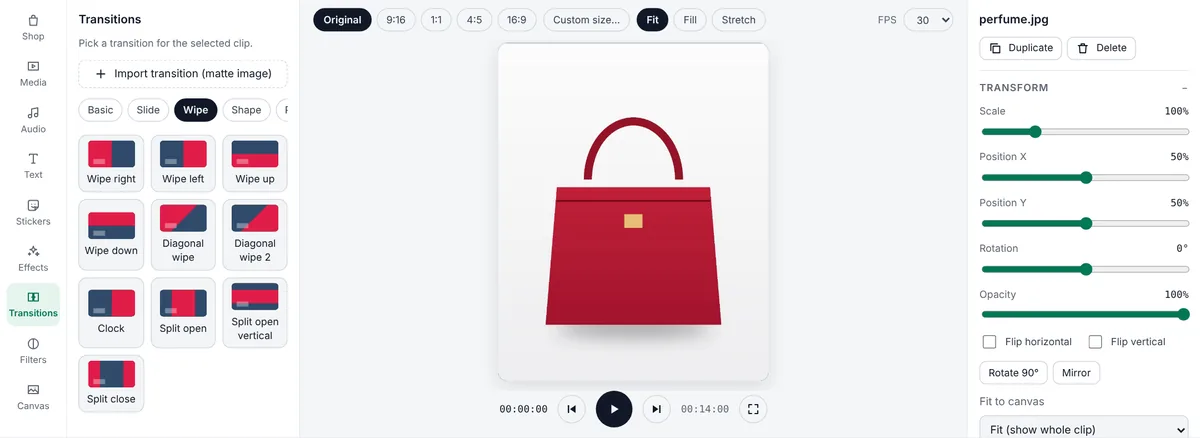
- Open the Transitions tab, choose the Wipe group and click Wipe right (or Diagonal wipe or Split open).
- In the Inspector under Animation, set Transition duration to about 1 second so viewers can follow the line.
For photos, make each clip 2–3 seconds by dragging its edge on the timeline, so the before is visible long enough.
Method 2: side by side
Both moments on screen at once, split down the middle (or top and bottom for vertical videos).
- Click the before clip so it goes on Video 1. Drag the after clip from the Media panel onto Video 2 at the same time position.
- Select the after clip. In the Inspector, open Crop and raise Left to 45%: now only its right side shows.
- Select the before clip and crop its Right side the same way, so the halves meet in the middle. Use Position X in Transform if you need to nudge them.
- For vertical videos, crop Top and Bottom instead and stack them.
- Add a thin white line between them: Stickers → Shapes → Line, rotated 90°.
Labels and the offer
- Add BEFORE and AFTER labels from the Text tab, or use badges from Stickers → Badges and type your own words.
- End with the product: a clean shot of it, the price tag and Order on WhatsApp, or make that ending with the product video maker and join the two videos.
- A Whoosh sound effect from the Audio tab during the wipe makes the reveal satisfying.
Before-and-after with photos only
If you only have photos, the wipe method works the same way. Remove distracting backgrounds with the background remover only if both photos get the same treatment, so the comparison stays fair.
Ideas by product type
- Cleaning: one stained area, one wipe or spray, then the clean result, filmed from the same spot.
- Beauty: bare skin, then the finished look; mention the shade and that no filter was used.
- Home and organising: the messy shelf and the organised one, with the organiser's price at the end.
- Tailoring and repairs: the torn or loose item and the finished repair, with turnaround time and price.
Export
Before-and-after videos are short: 6–15 seconds. Export vertical for TikTok, Reels, Snapchat and Status, or square for feeds and marketplaces. Keep the BEFORE/AFTER labels away from the bottom of vertical videos, where app buttons sit.
Frequently asked questions
How do I make a before and after video for free?
Put the before and after clips next to each other in Mshopi and add a Wipe transition, or place them on two tracks and crop each to half. Free, no watermark.
What makes a before-and-after video convincing?
Filming both moments from exactly the same position, angle and light, with no extra filters on the after shot.
Can I use photos instead of video?
Yes. The wipe and side-by-side methods work with photos as well as clips.
Make your product video now
Mshopi is free, needs no account and never adds a watermark. Your photos stay on your device.